Introduction Link to heading
In my previous post, I introduced the two second-hand Ender 3 printers I recently acquired. One was completely stock and fully operational, while the other had a variety of upgrades — but was non-functional. I decided to take on the challenge of restoring and improving the broken Ender 3, ordering a range of replacement parts that would not only get it printing again but also enhance its performance.
Here’s the configuration the broken printer came with:
- BigTreeTech SKR Mini E3 v2 (Amazon / AliExpress) – A 32-bit control board which works great with Klipper.
- Microswiss Direct Drive Extruder and All-Metal Hotend – Great for flexible filaments and better thermal control.
- Creality Dual Z-Axis Upgrade Kit – Helps maintain gantry level and improves layer consistency.
- Upgraded Bed Springs – Simple but essential for better bed stability and reduced releveling.
- BLTouch Bed Probe - This is a automatic bed leveling probe. I’m not sure if it’s a genuine BLTouch, or a clone.
To bring it back to life, I ordered the following components:
- Triangle-Lab 50W Heater Cartridge
- 25% more power than stock (40W → 50W) for quicker heat-up times.
- ATC Semitec 104GT-2 Thermistor
- High accuracy, faster thermal response, and rated up to 300°C.
- Mellow 3D Heater Block + Silicone Sock
- Not a massive upgrade, just a necessary part of the hotend assembly!
- Creality Hardened Steel Nozzle (0.4mm)
- Ideal for abrasive filaments and long-term durability.
- BIQU Microprobe v2
- Whilst the BLTouch is fine, I will discuss my reasons for switching later in this post.
While I’m still waiting on the hardened steel nozzles to arrive, I decided to move forward using some standard brass 0.4mm nozzles for now. Since I’ll be printing primarily in PLA, they’ll do just fine.
The Plan: Breathing Life Into a Dead Printer Link to heading
As mentioned in my previous post, this particular Ender 3 originally belonged to my brother. He picked it up second hand shortly after I got my working (but stock) Ender 3. However, he struggled to get reliable prints out of it and eventually gave up—replacing it with a Bambu Labs A1 for that “it just works” 3D printing experience. I gladly took the broken Ender 3 off his hands with a goal: to fix it and make it better than ever.
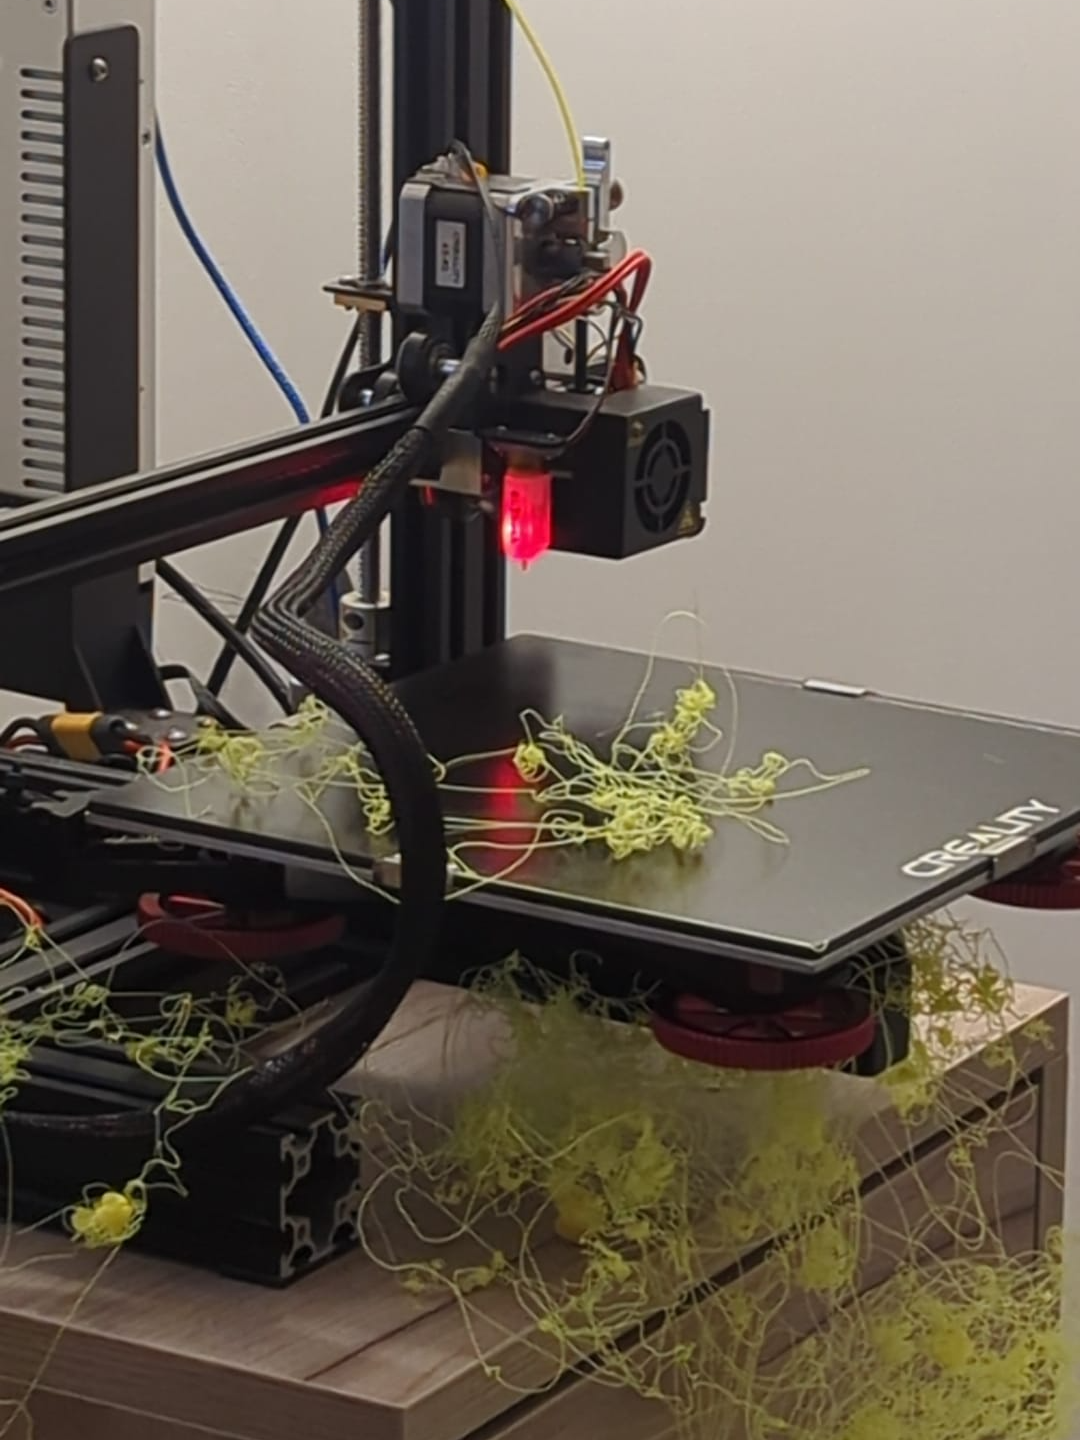
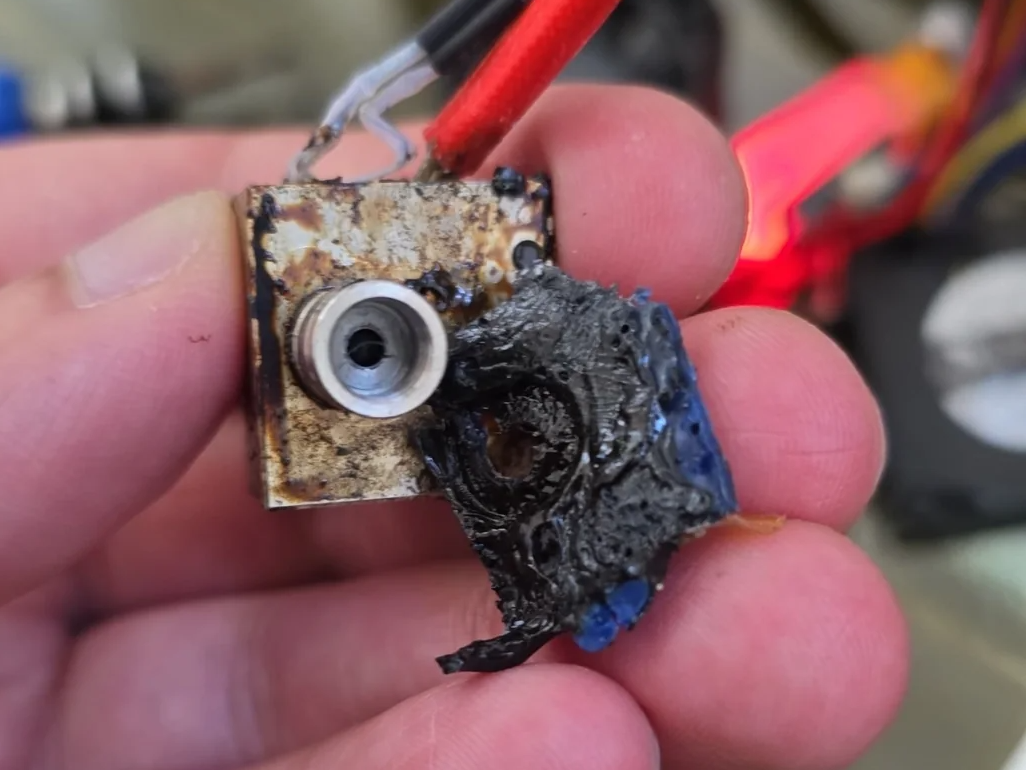
When the printer arrived, I ran into similar issues: inconsistent extrusion and frequent nozzle clogs. After removing the stock Ender 3 cooling shroud, the problem became clear. The hotend was covered in burnt-on filament, which was leaking from the heat break indicating that the hotend was assembled incorrectly. The thermistor wire had nearly been severed by an overtightened screw, and the heater cartridge wiring was in rough shape.
💡 I strongly suspect the compromised thermistor was a major contributor to the inconsistent extrusion.
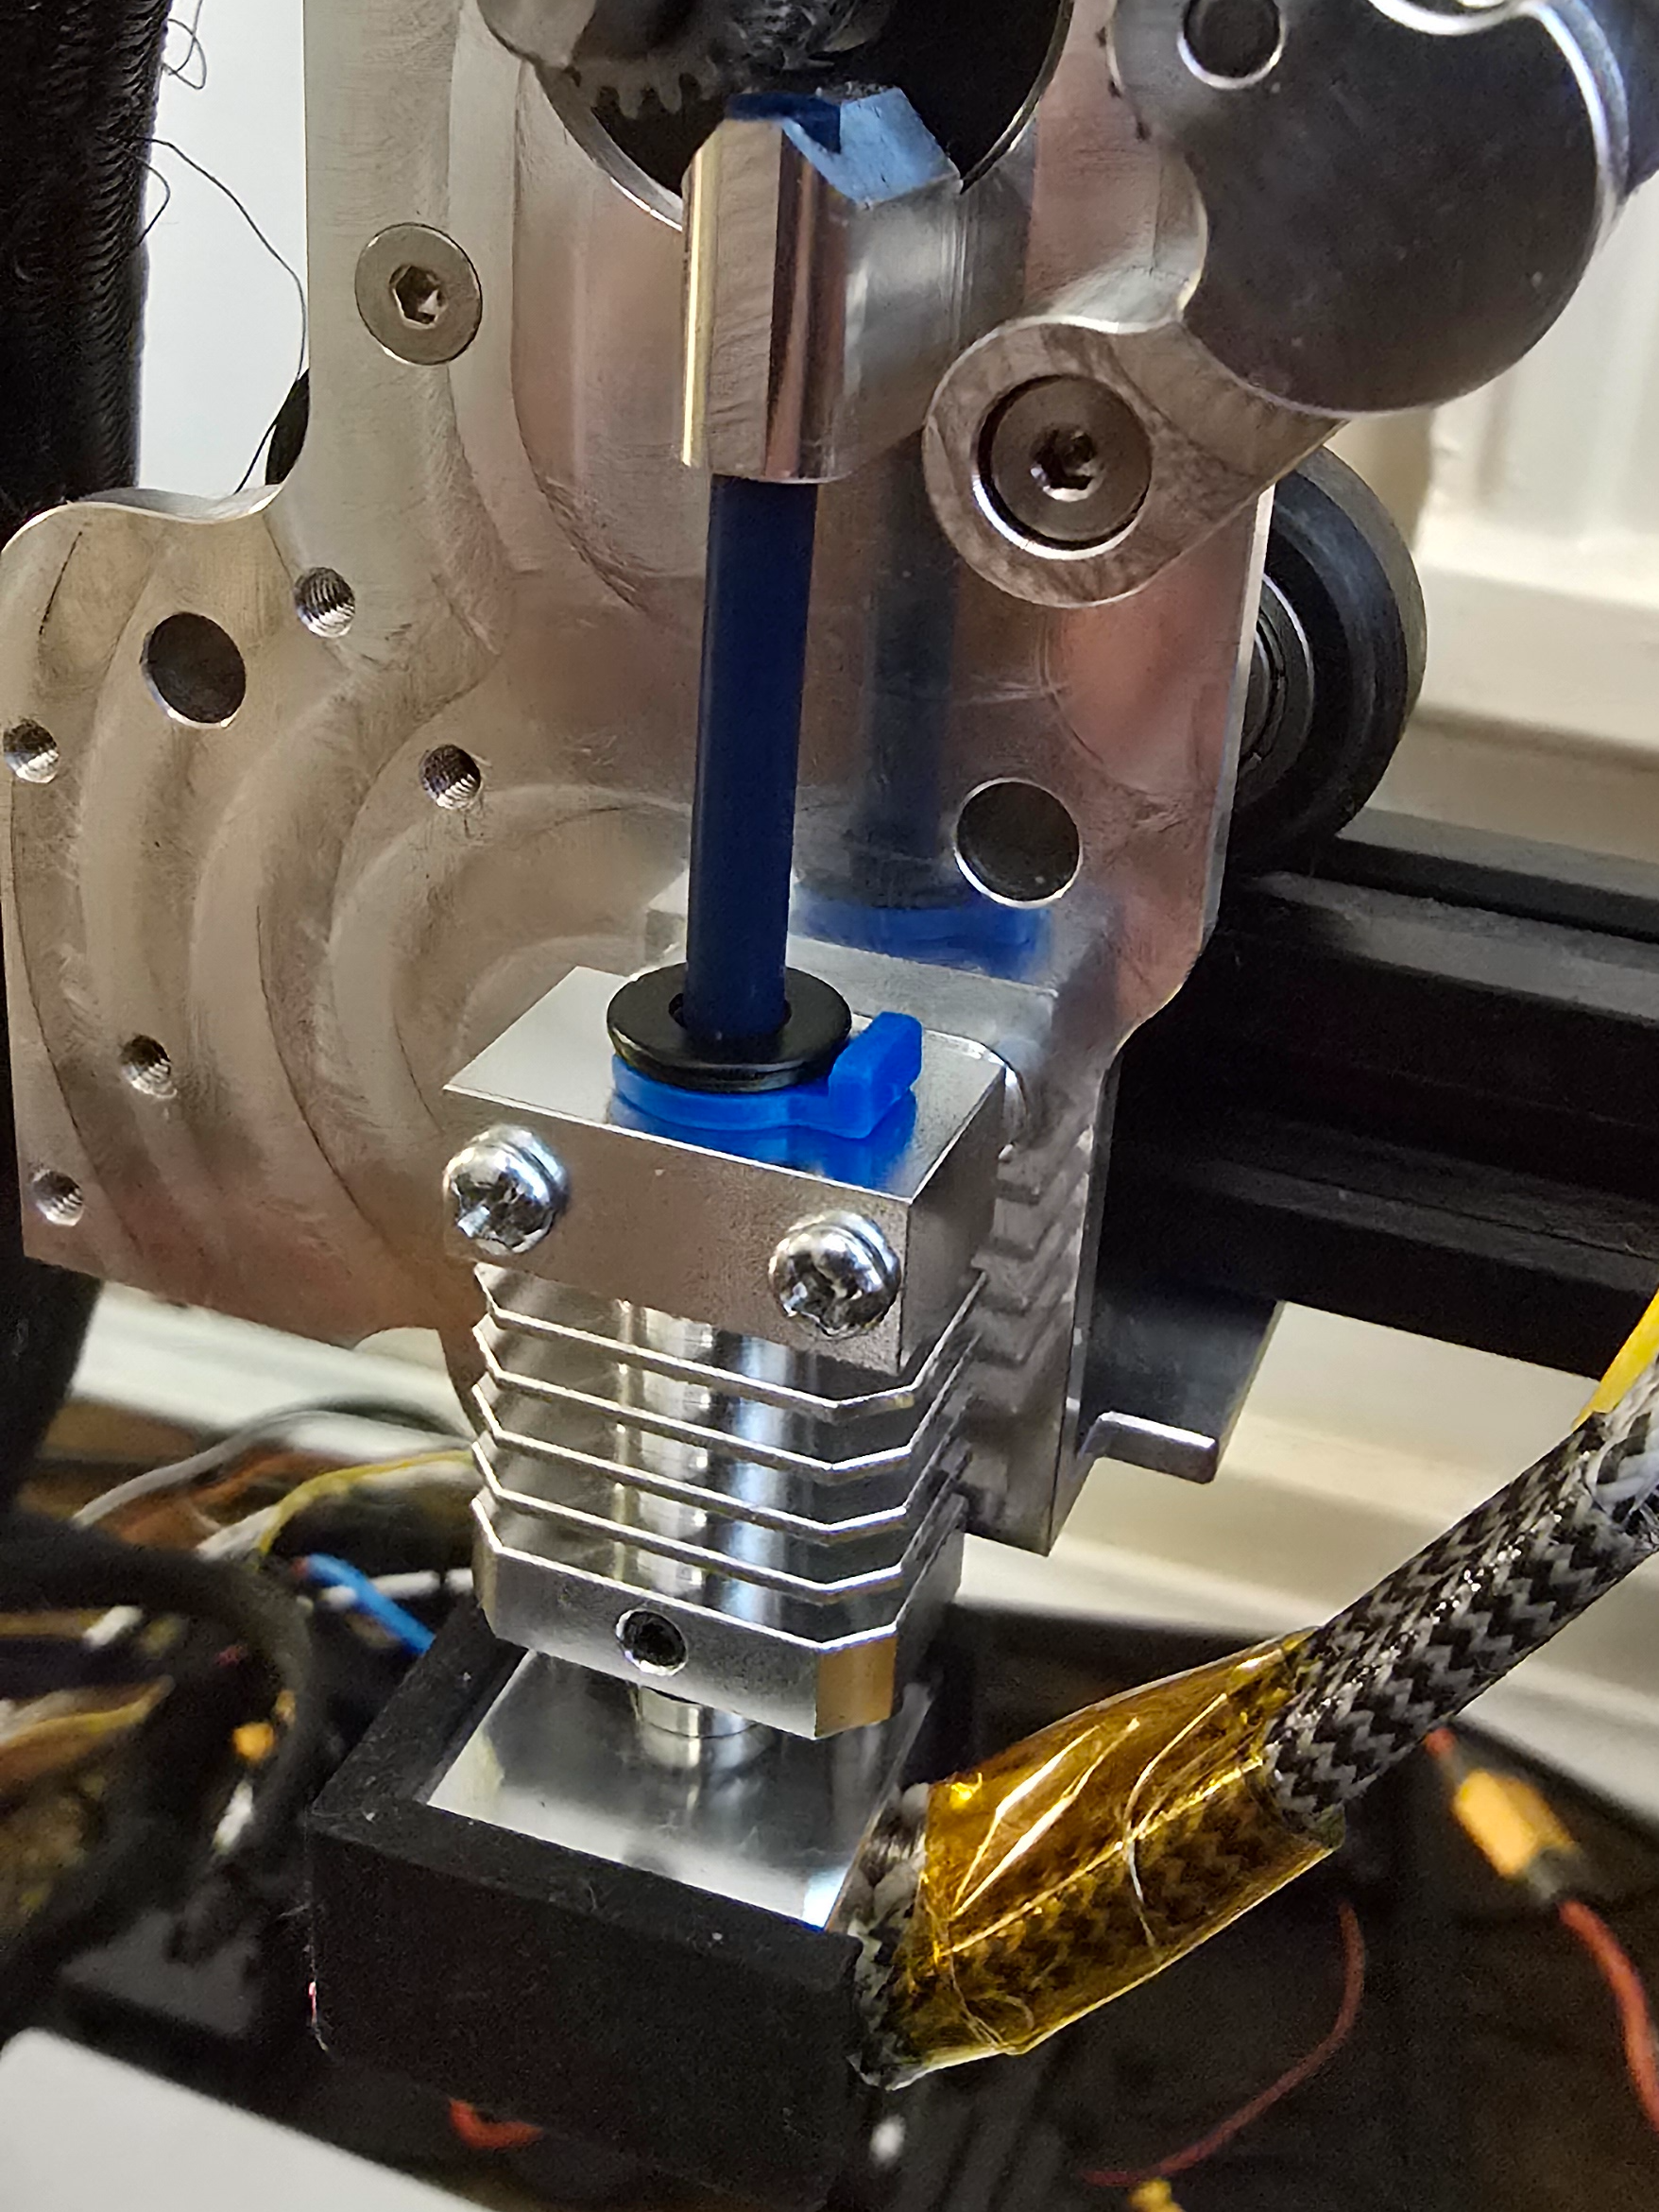
My initial plan was simple: swap out the heat block, heater cartridge, and thermistor. But when I tried to remove the heat break, I accidentally damaged the threads on the Microswiss titanium heat break. It was cheaper to buy a Microswiss clone, than to buy a real Microswiss replacement heat break, and so I ordered the Triangle-Lab All-Metal Hotend.
At the time, I thought this Triangle-Lab kit didn’t include a heater block, so I also ordered a Mellow 3D heater block with a sillicone sock. To my surprise, the Triangle-Lab kit actually came with a heater block and silicone sock included, so I won’t be using the Mellow-3D parts for now. They can just go into my spare parts box.
This next part might be a little controversial…
Initially, I considered using the Triangle-Lab heat break (and heat block) with the original Microswiss heatsink. But ultimately, I opted to swap out the entire assembly and go all-in with the Triangle-Lab hotend. My reasoning? Clean integration. Mixing parts from different manufacturers just felt mess y— so I decided to standardise on a single brand for the entire hotend setup.
I don’t believe there’s a meaningful performance difference between the Microswiss and Triangle-Lab heatsinks, I’m not too sure of the best way to confirm this. The Microswiss heatsink is slightly taller, but according to my basic kitchen weight scale they weigh around the same (13 grams). I wanted things to be tidy, so going with a single brand for the whole hotend setup made sense to me.
Installing the All-Metal Hotend Link to heading
Installing the new all-metal hotend was a fairly straightforward process.
I began by carefully removing the old hotend assembly, including the damaged heater cartridge and thermistor. Once those components were out, I routed the new wires through the Ender 3’s toolhead loom and connected them to the BTT SKR Mini E3 v2 control board.
If you’re unfamiliar with this process, this video offers a great visual guide for removing and installing hotend components on a slightly newer Ender 3 model:
Because the Triangle-Lab All-Metal Hotend is a clone of the Microswiss design, I used the official Microswiss video guide for assembling the new hotend and mounting it to the carriage:
🛠️ Hot Tip: When assembling the hotend, screw the heat break fully into the heater block so it sits flush—don’t over-tighten yet. Next, screw in the nozzle until it contacts the heat break inside. You’ll leave a small visible gap between the nozzle and the block at this stage.
Once the hotend is mounted and you’ve powered up the printer, you’ll heat it up to operating temperature and tighten the nozzle fully with a spanner. This ensures there’s no gap between the nozzle and the heat break, which is crucial for avoiding leaks and maintaining consistent extrusion.
This video provides an excellent explanation of the entire process:
Installing the BIQU Microprobe v2 Link to heading
Although this Ender 3 came with a working BLTouch probe, I decided to swap it out for a BIQU Microprobe v2 — the same one I installed on my other Ender 3 build. I’ve had a great experience with it so far, and I liked the idea of having matching probe setups on both printers for easier configuration and consistency in my Klipper configuration.
Why I Switched From BLTouch Link to heading
While the BLTouch is a solid and popular option, the Microprobe v2 offers a few key advantages:
- Improved accuracy: The Microprobe delivers more consistent and precise probing results. While I’m not printing ultra-high-precision parts (yet), having repeatable mesh leveling is still beneficial.
- Lower weight: This was the real motivator. The Microprobe is significantly lighter than the BLTouch, which is important for printhead dynamics — especially since I plan to upgrade to a HeroMe Gen7 cooling system in the future. That system adds weight, so every gram saved elsewhere helps maintain print speed and quality.
Mounting Considerations Link to heading
Currently, I’m using the Satsana fan shroud, which works well, but isn’t designed specifically for the much smaller Microprobe. To compensate, I added a simple spacer to ensure the probe tip triggers before the nozzle touches the bed.
Once I move to the HeroMe Gen7, this will be much cleaner—there are already community-made HeroMe adapters specifically designed for the Microprobe v2.

Printing Enclosures for the BTT SKR Mini and Raspberry Pi Link to heading
When I received this Ender 3, it didn’t come with an enclosure for the BTT SKR Mini E3 v2 board—leaving all the wiring and components completely exposed. Aside from the visual clutter, exposed electronics are a long-term reliability concern, so I decided to design a clean enclosure setup.
There are plenty of great printable enclosure options out there. One of my early favorites was this all-in-one rear-mounted enclosure, which houses both the control board and the Raspberry Pi. However, I was planning to move the power supply to the rear of the printer using this mod, and I wanted a front-mounted enclosure to pair with that layout.
Eventually, I found a fantastic solution: SKR Mini E3 + Raspberry Pi Front Enclosure (Printables)
This enclosure checked all the boxes for me:
- ✅ Compatible with the BTT SKR Mini E3.
- ✅ Includes a separate housing for the Raspberry Pi running Klipper.
- ✅ Provides a clean cable pass-through between enclosures — perfect for switching from USB to UART communication, which I also done while tidying everything up.
- ✅ Thoughtful ventilation: Both enclosures have front-facing vents and space for a bottom-mounted exhaust fan.
💡 Most stock Ender 3 cases have a top-mounted fan, which can suck in dust and bits of filament. This design moves the fan to the bottom, where it’s less exposed—solving a long-standing annoyance elegantly.
I’ll likely be printing this same setup for my other Ender 3 soon becuse I like it that much.
I ran out of black filament whilst printing the lid for the right hand enclosure for the Raspberry Pi, but I will print a replacement when I have more black filament. I’m also still awaiting a buck converter so I can get rid of the Micro-USB cable going into the Rasberry Pi enclosure.
I printed the enclosures with Elegoo Black PLA+ with 20% infill and no supports.
Updating My Klipper Configuration Link to heading
With the hardware upgrades completed, it was time to update the Klipper firmware configuration to match the new thermistor, hotend, and probe setup. Here’s how I brought everything together:
Updating Thermistor Configuration Link to heading
Since I replaced the stock thermistor with the ATC Semitec 104GT-2, I had to update the [extruder] section in my printer.cfg to ensure accurate temperature readings:
[extruder]
...
sensor_type: ATC Semitec 104NT-4-R025H42G
max_temp: 300
...
Setting the correct sensor_type ensures temperature accuracy, critical for both print quality and safety. I also increased the max_temp to 300°C, which aligns with the specs of both the thermistor and all-metal hotend.
PID Tuning Link to heading
PID tuning (Proportional-Integral-Derivative tuning) helps your printer maintain a stable and consistent nozzle temperature, especially after changing components like the heater cartridge or hotend.
Since I mostly print PLA at 200°C, I ran the following command:
PID_CALIBRATE HEATER=extruder TARGET=200
After the calibration finished, I saved the new values to the configuration:
SAVE_CONFIG
This step significantly reduces temperature fluctuations, which helps avoid under-extrusion or stringing.
Configuring the BIQU Microprobe v2 Link to heading
I replaced the existing BLTouch with the BIQU Microprobe v2, which required removing the [bltouch] section and adding the following probe configuration:
[gcode_macro PROBE_DOWN]
gcode:
    SET_PIN PIN=probe_enable VALUE=1

[gcode_macro PROBE_UP]
gcode:
    SET_PIN PIN=probe_enable VALUE=0

[output_pin probe_enable]
pin: PA1
value: 0

[probe]
pin: ^!PC14
deactivate_on_each_sample: False
x_offset: -49
y_offset: -9
samples: 3
samples_tolerance: 0.05
samples_tolerance_retries: 3
activate_gcode:
    PROBE_DOWN
    G4 P500
deactivate_gcode:
    PROBE_UP
🔧 Tip: You’ll also need to configure other sections like
[safe_z_home],[bed_screws], and your virtual Z endstop to fully integrate the Microprobe.
Re-run Input Shaper Calibration Link to heading
Input shaping helps reduce vibrations during fast movements by adjusting the motion planning to cancel out resonance. This results in cleaner prints with fewer artifacts like ghosting or ringing—especially at higher speeds.
Since I made significant hardware changes to the hotend—including weight distribution and mounting—I re-ran the input shaper calibration to ensure optimal performance.
I’m using a Mellow ADXL345 accelerometer for this setup. This video does a great job of explaining what input shaping is and how to set it up in Klipper:
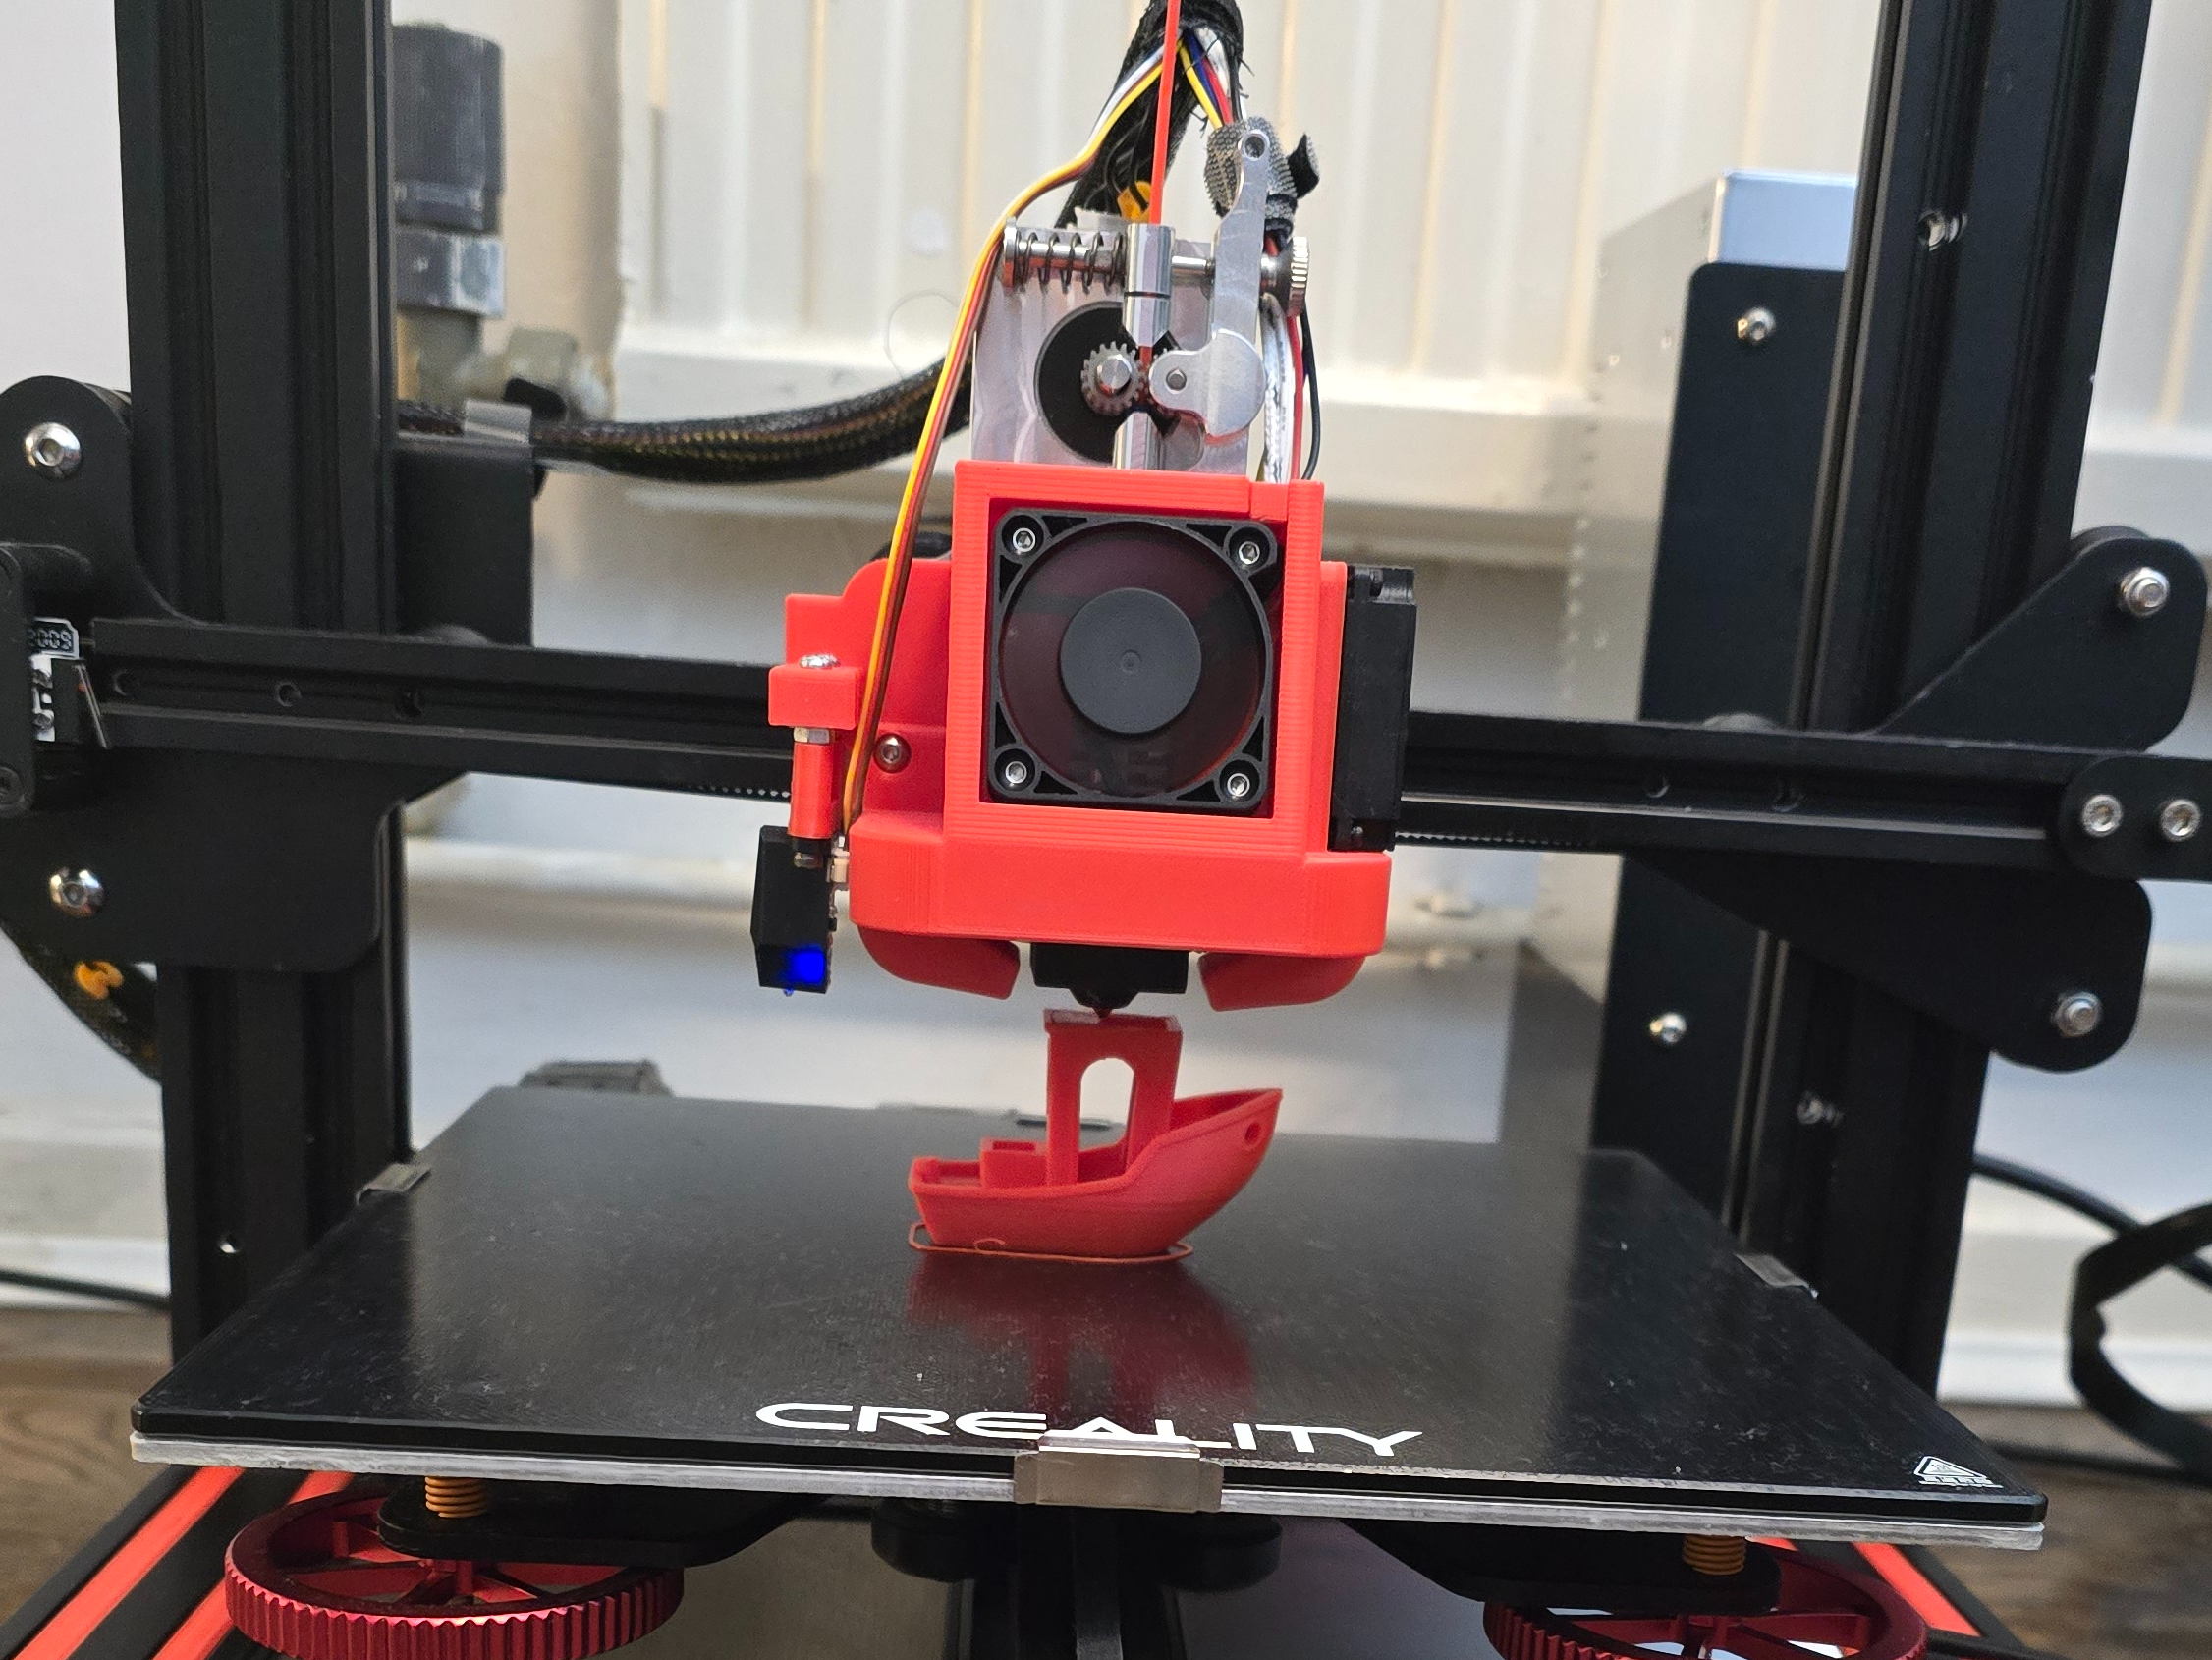
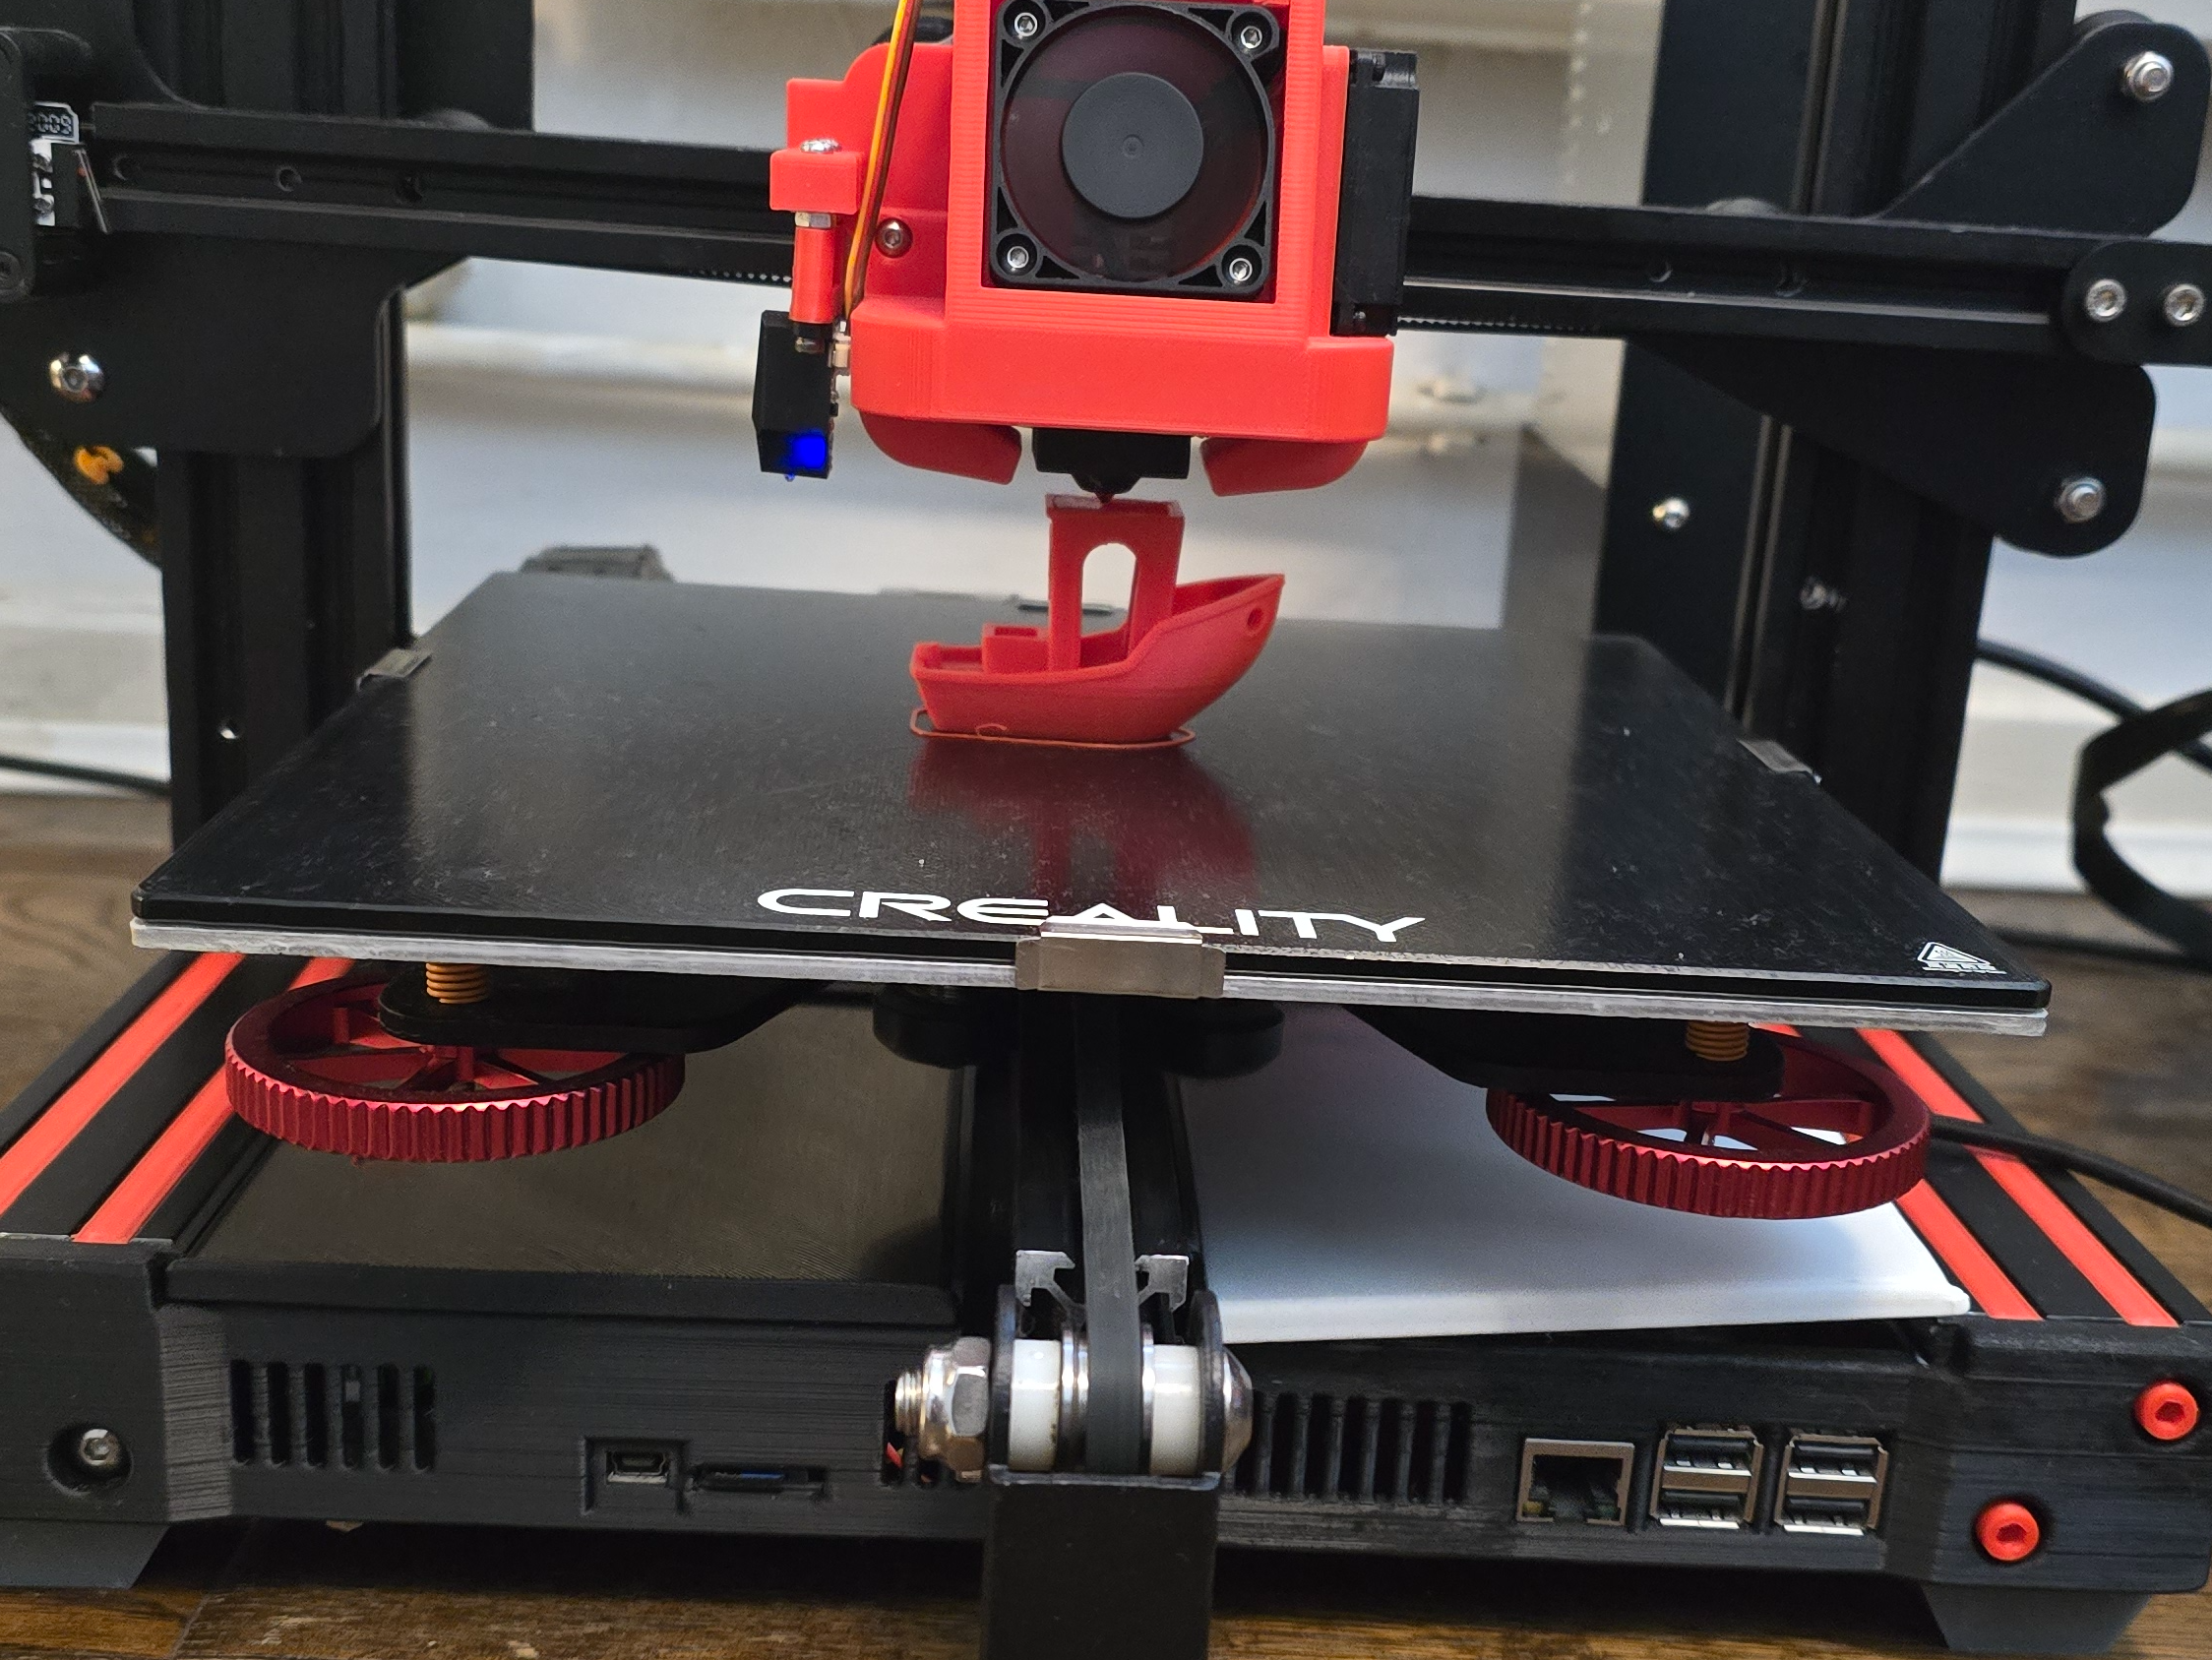
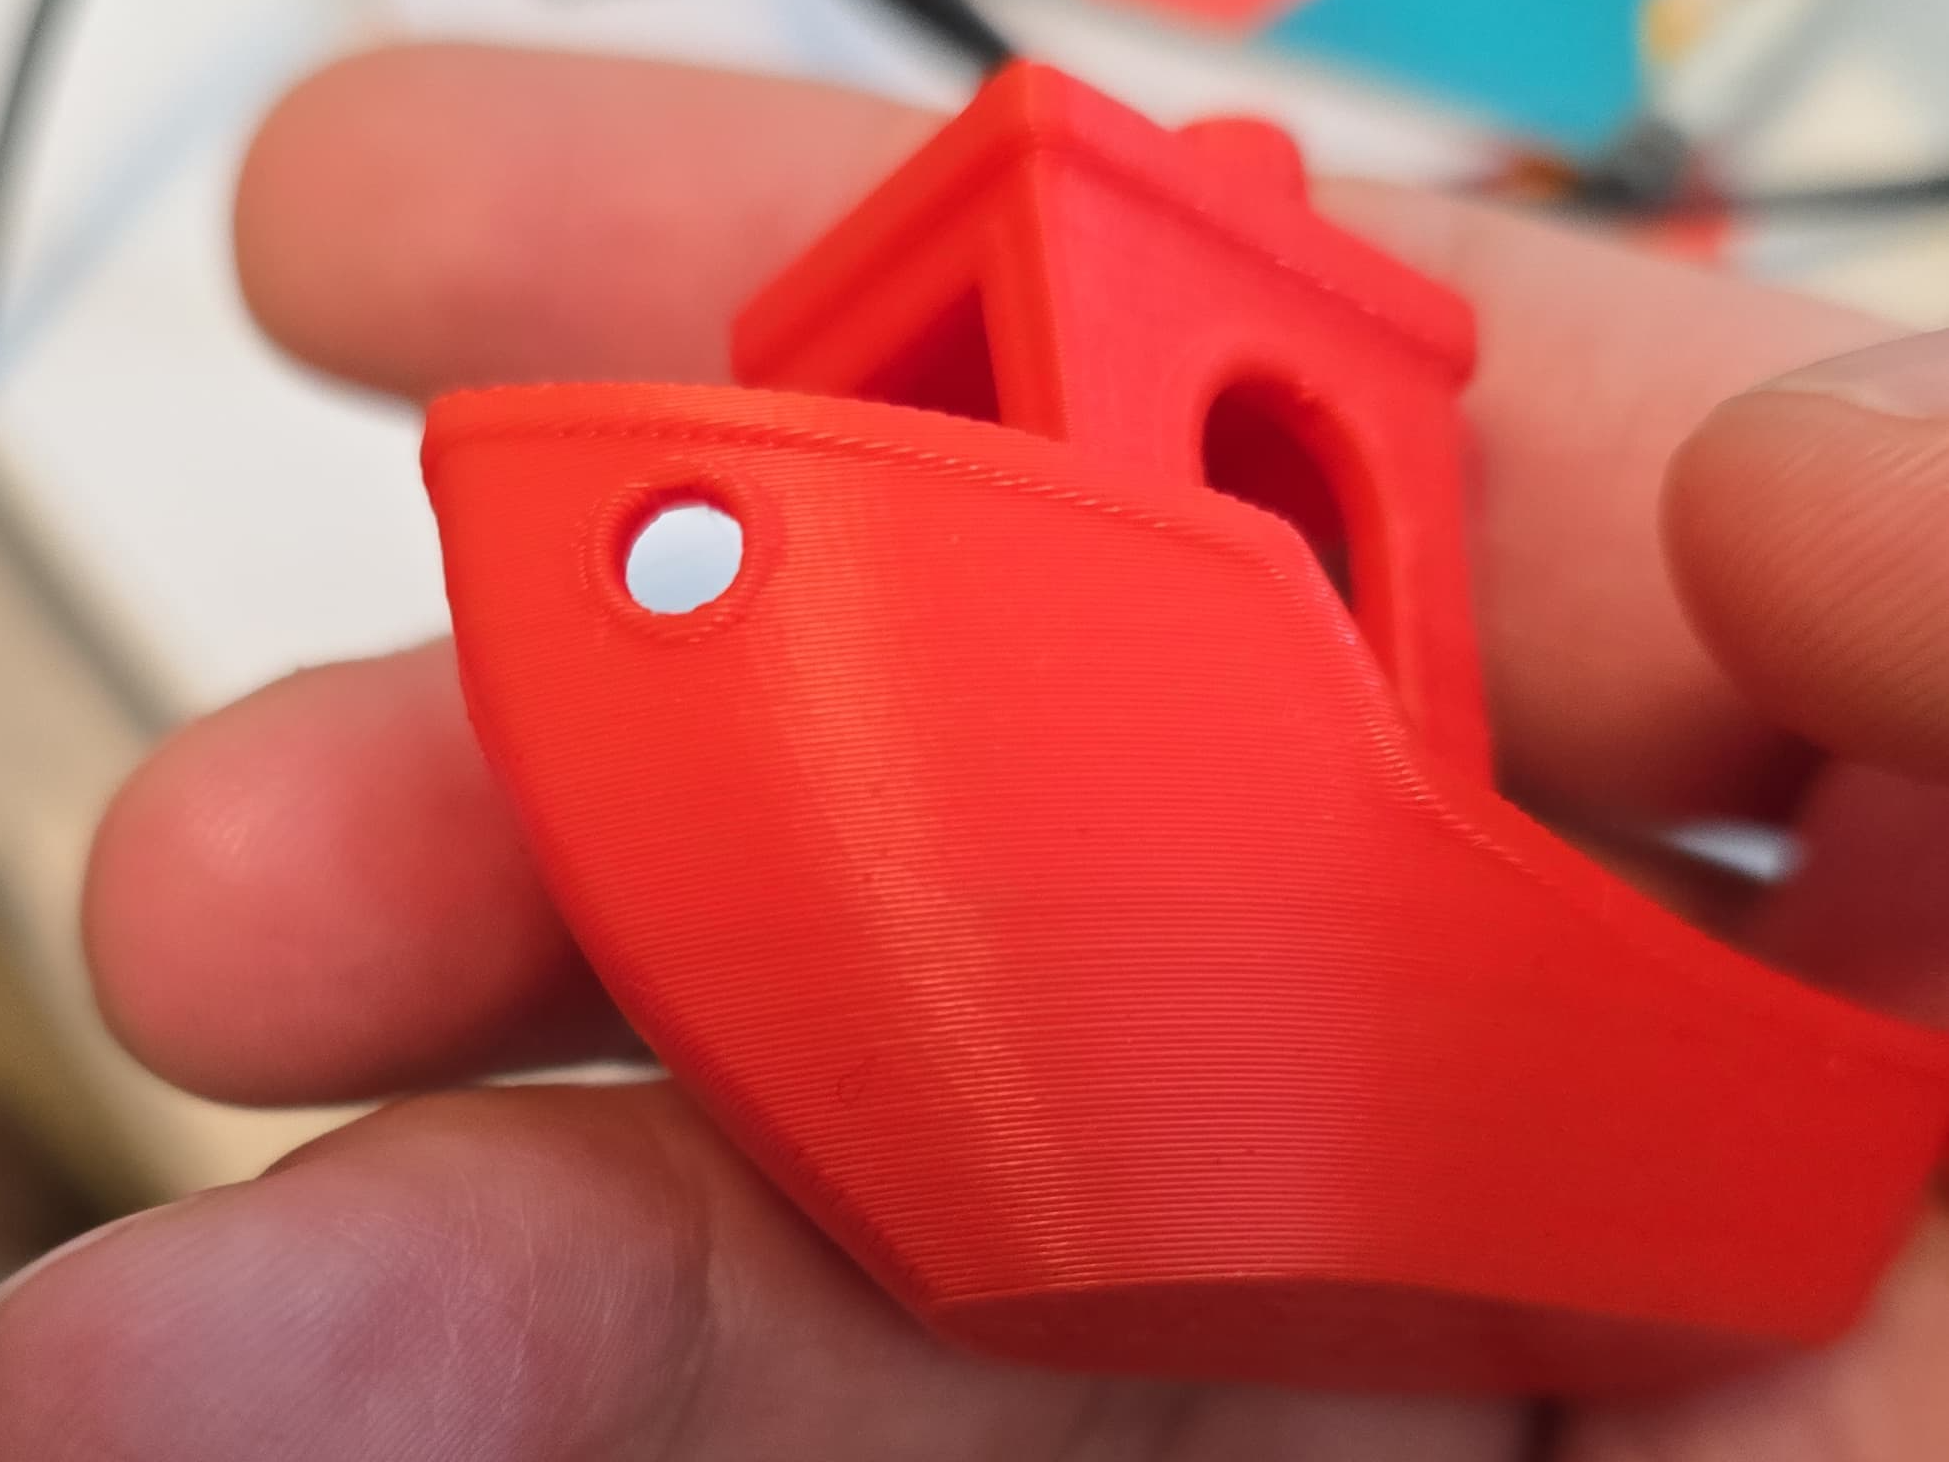
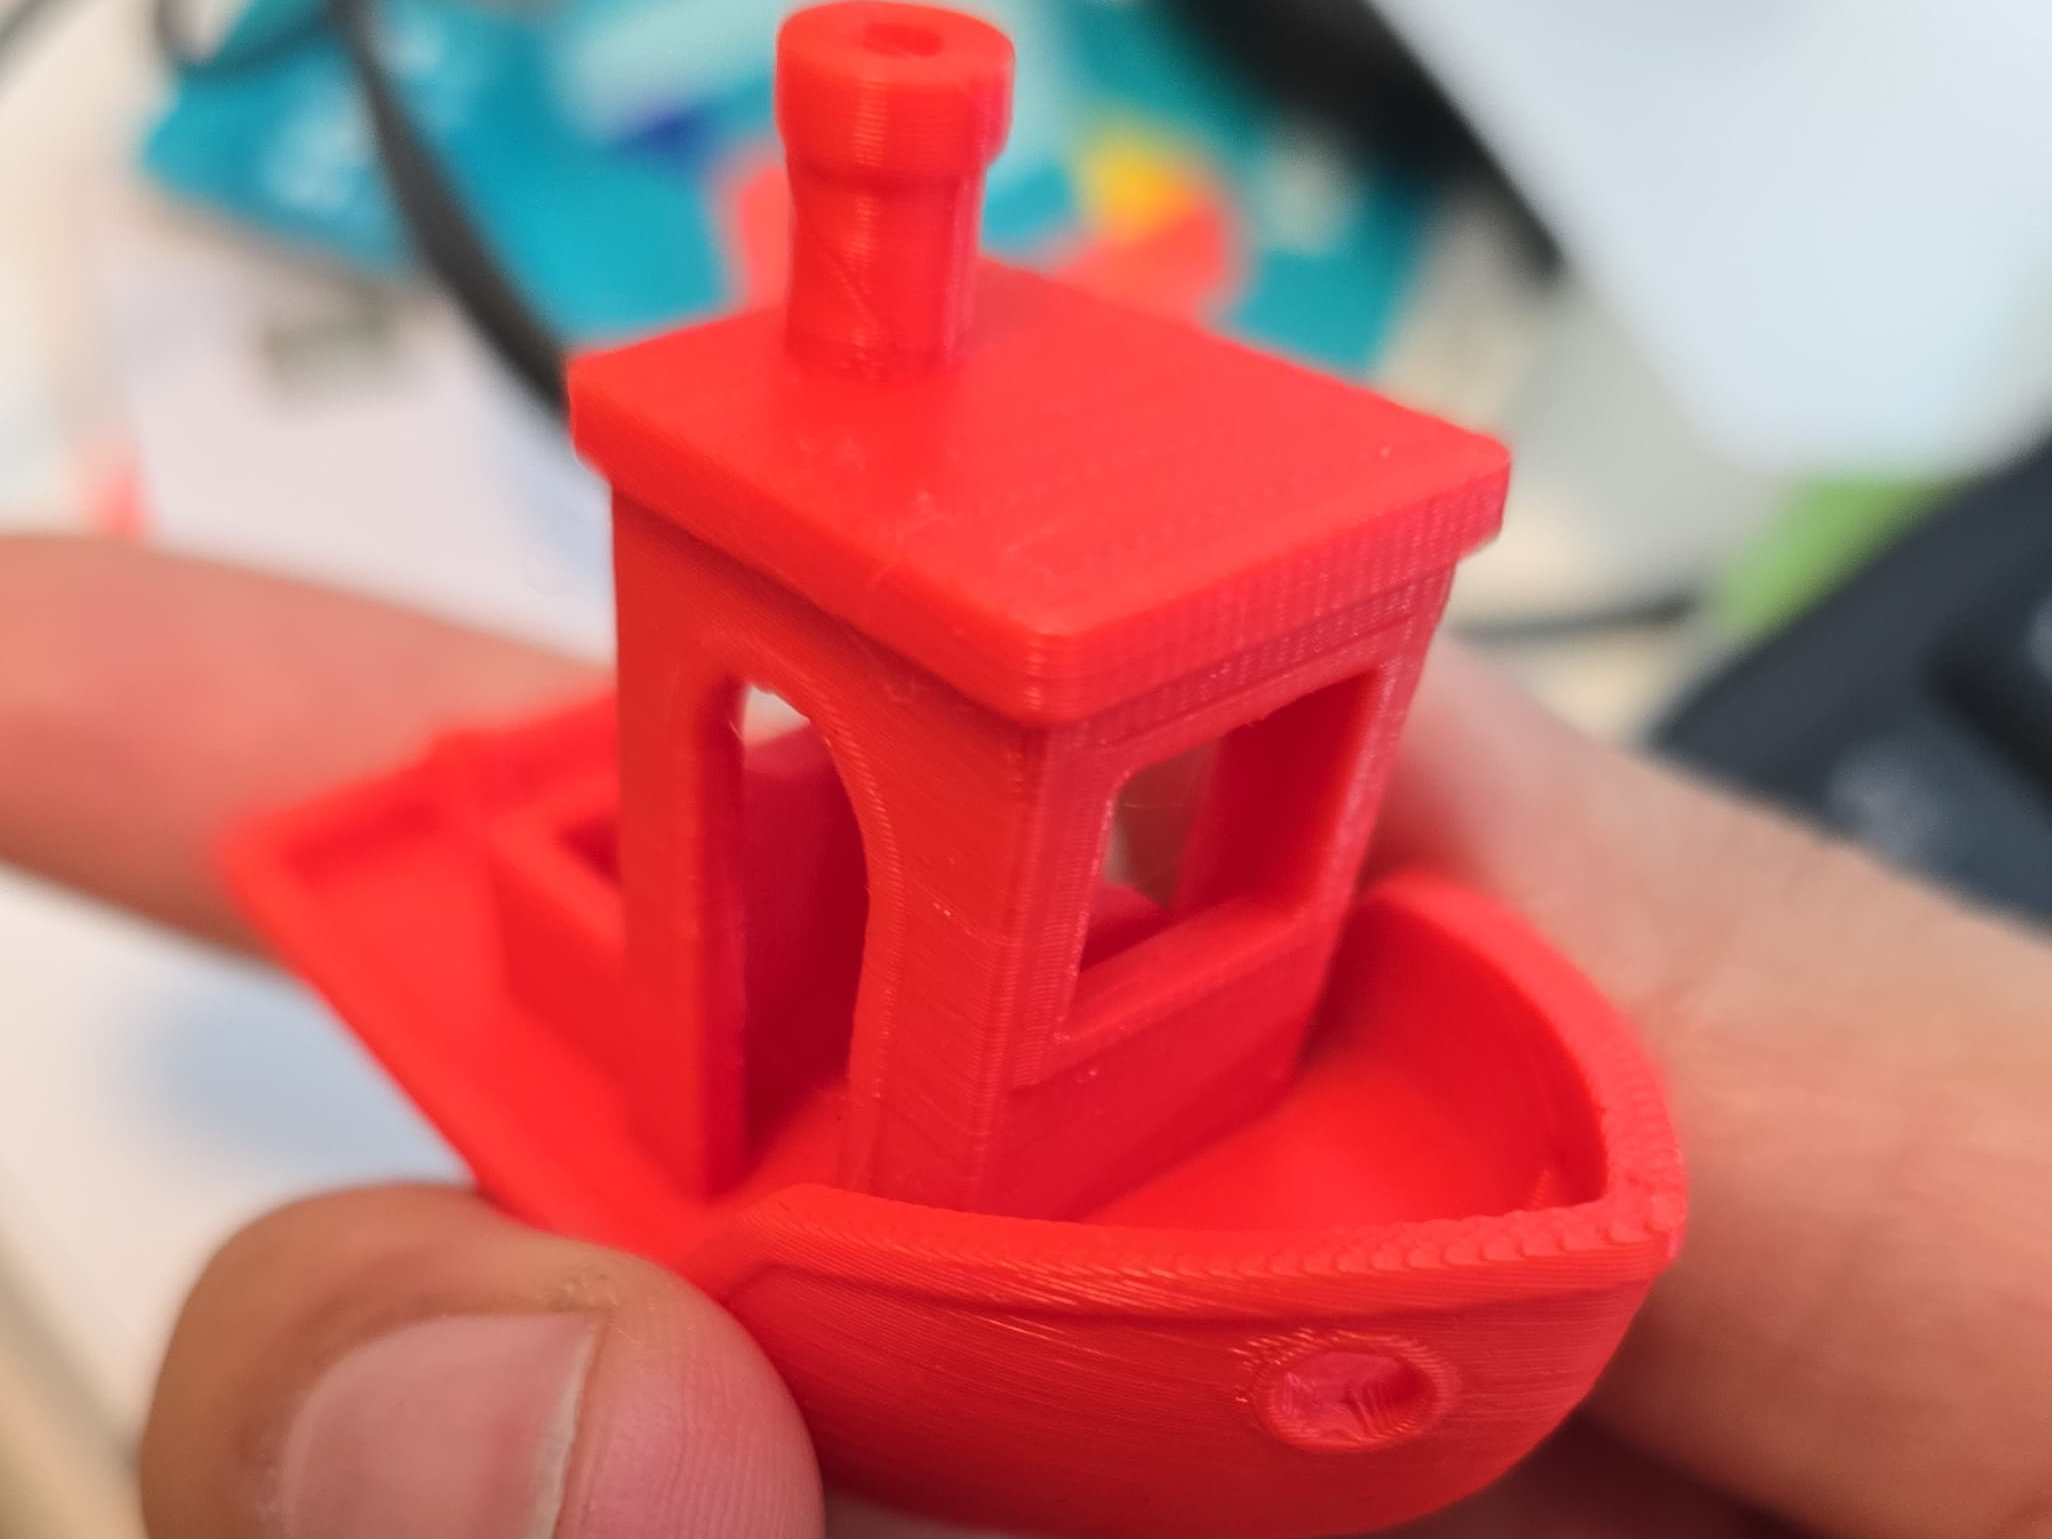
The Test: Benchy Time Link to heading
With everything installed and configured, it was finally time to test the newly refurbished Ender 3 by printing a classic Benchy.
Since the printer was non-functional when I first got it, I unfortunately don’t have any “before” prints to compare the results with—but I can confidently say that I am very happy with the results. That’s a huge win after all the hardware issues this machine had.
The Benchy print validated:
- The new hotend and thermistor setup is working perfectly
- The Microprobe is giving accurate bed leveling
- The PID tune is keeping temps rock solid
Final Thoughts: A Printer Reborn Link to heading
After a decent amount of hardware troubleshooting, replacement, and configuration, I’m happy to say this Ender 3 is now officially back from the dead.
I’m genuinely happy with how this build turned out. I’m happy with the print quality, and the printer has been reliable, and perhaps just as importantly—the wiring is finally cleaned up. That mess of loose cables from the original setup lacking any enclosure for the control board was bothering me more than I expected, so getting everything enclosed and routed properly is a huge quality-of-life win.
As for the new hotend setup: the Trianglelab all-metal hotend has been working flawlessly so far. That said, I don’t have a whole lot to compare it to other than my other Ender 3, which is still running a stock Bowden setup—and to be fair, the stock hotend has always worked fine for me. The main issue here wasn’t the design of the Microswiss or stock hotend; it was simply the state this printer arrived - not working at all.
One thing I am especially enjoying is the Microswiss Direct Drive extruder that this printer came with. It makes filament swaps way easier. I’m considering switching my other Ender 3 to a direct drive system too, although I’m still researching the options.
Since I bought a 2-pack of heater cartridges and thermistors, I’ll be upgrading the thermistor and heater on my second Ender 3 soon. I’m also planning to install a Trianglelab hotend on that machine to standardize the setup between the two printers and make maintenance and tuning easier across the board.
What’s Next? Link to heading
I’ve already got a short wishlist of upgrades I want to tackle next on this machine:
Magnetic Build Plate: I’m using the stock glass build plate that comes with the Ender 3 at the moment. It can be difficult to remove prints from it sometimes. A magnetic build plate makes it a lot easier, as you can flex the removable part of the build plate allowing the print to just pop off.
Linear Rails: I want to switch the X and Y axes over to linear rails. These offer improved rigidity and precision, especially for faster print speeds. They eliminate slop and flex that you might get from standard V-wheels, and should lead to more consistent layer alignment and smoother surface finishes.
Oldham Couplers + POM Nut for Z-Axis: Oldham couplers help eliminate Z-wobble by decoupling lateral movement from vertical movement, which can occur when the lead screw isn’t perfectly straight. Pairing that with a POM anti-backlash nut will help reduce any vertical play in the Z-axis, giving cleaner walls on tall prints.
I think after this point I will probably stop with any further modifications for a while… or at least that’s what I currently think.
A Different Kind of Fun Link to heading
This whole project has been a great reminder that 3D printing isn’t just about the objects we create—it’s also about the machines themselves. While designing and printing things is fun, there’s a totally different kind of satisfaction in fixing and upgrading a piece of hardware with your own hands. There’s something uniquely rewarding about working on a physical machine, seeing real improvements, and learning how all the components interact. In my day job as a DevOps engineer, most things have moved to “the cloud”, and I rarely touch real physical hardware. It’s something that I do miss, so this has been a lot of fun.
Honestly, it’s got me itching for the next project… I’ve been thinking of diving deeper into the rabbit hole and building a Voron 0.2. Coming soon? 😁
Affiliate Links Link to heading
- BIGTREETECH SKR Mini E3 V3.0 (Amazon)
- BIGTREETECH SKR Mini E3 V3.0 (AliExpress)
- BIQU Microprobe v2 (AliExpress)
- Triangle-Lab 50W Heater Cartridge (AliExpress)
- ATC Semitec 104GT-2 Thermistor (AliExpress)
- Mellow 3D Heat Block + Silicone Sock (AliExpress)
- Creality Hardened Steel Nozzle (AliExpress)
- Triangle-Lab All-Metal Hotend (AliExpress)
- Mellow 3D ADXL345 Accelerometer (AliExpress)
- Elegoo PLA+ (UK Store / US Store / CA Store / EU Store))